Monday, November 29, 2010
Holiday Crafting
You may think I've been craft~less for a while, but in reality things are now secrets as they are going to be gifts for the holidays. . . Sorry for not sharing. Perhaps when the gifts are given they will be posted about.

Friday, November 5, 2010
Bummer. . .
I made a quilt (let's call it Baby Quilt #3). I gave it away with out taking any photos of it. How is this possible. I better contact my friend to see if she can take some pictures of it for me.
Oh well. Bummer.
I got my hands on one photo from the baby shower...

Oh well. Bummer.
I got my hands on one photo from the baby shower...

Thursday, October 21, 2010
Hedgehog!
Look what I made!!!


Isn't it cute!?
My nephew is coming to visit next week. Perhaps this guy will be of interest, we'll have to see!
Tuesday, October 19, 2010
Baby Quilt #2
I made another baby quilt for another friend who is pregnant. This one is for a baby who's gender is a secret until birth, so I went for the gender neutral colors. It is bright and fun.
I didn't have the best light for taking photos, but here they are anyways.


I kind of put these two tutorials together, found here and here, and pieced a quilt top instead of using a solid piece of fabric for the results above.

I didn't have the best light for taking photos, but here they are anyways.

As you can see I did a diagonal stripped pattern.

I used a very soft minky fabric for the back. Yes it is bright orange. It matches some of the orange in the top of the quilt, and this baby has parents that both went to the University of Illinois, an orange school.

I added a little tag on the corner that says the quilt is made by me!
Sunday, September 19, 2010
Baby Quilt
One of my childhood friends had a baby a few weeks ago, and I decided to make the baby a quilt. The only other real quilting I've done was when I made a table runner, so this was exciting. I choose fabrics, which was not so easy. At first I wanted them to be baby fabrics, but later decided that wasn't the look I was going for, so I ended up picking other fabrics. I watched a very helpful YouTube video on how to make this 'disappearing nine patch' pattern, and off I went cutting, sewing, piecing etc. A disappearing nine patch is when you make a square made up of nine squares (3x3), and then cut it into quarters rotating them, so the seams do not line up.
 I ended up with a quilt top that looked like this:

I then added a border, layered the back batting and front, quilted it with ties, added the binding with mitered corners, and I was done!


I then added a border, layered the back batting and front, quilted it with ties, added the binding with mitered corners, and I was done!


Doesn't it look so nice on my couch and little chair?! I am tempted to make one for myself.
I hope little Lainey enjoys it for many years to come.
Monday, August 30, 2010
Hanging Bookshelf
My good friend Liz approached me and asked if I'd be willing to make/decorate her a small hanging bookshelf for a cozy cottage bunk bed room. I happily agreed!
The only things she said were:
I sat and thought a lot about how I was going to find a book shelf matching the dimensions... I normally create my projects from things I find in peoples trash or on craigslist. I did a little research and learned that there is a custom wood furniture/shelving place right around the corner from where I live. I talked to them and they said they could make me a shelf fitting those specs. Perfect!
I went to the paint store in hopes of them matching the paintchip I had. Unfortunately I didn't bring enough of the paint color for them to match using their fancy machine, so it was up to my eye and Peters encouragement to get the right color or at least a close match. I finally settled on what would be the yellow and hoped it would match. IT DID!
I sketched out a number of designs for it, that incorporated the wedding ring quilt idea. I settled on one design and began. I painted the whole shelf yellow. Then I made a stencil, traced it on to the side of the shelf and painted it white. THEN came the decoupaged quilting.
The pictures can tell you the rest of the story.


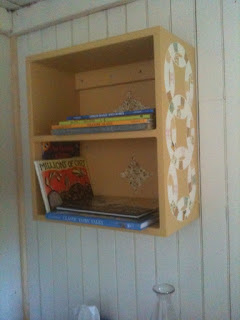

Next time I am at Liz's cottage I will try to take a picture of the whole room. You can see the quilt in the very last photo. I had fun making this for her, and am glad that it fits in so well with the rest of the decor.
The only things she said were:
- I should take a paint chip to match the yellow of the other furniture
- She showed me a particular quilt that would be living in that room
- She had the dimensions she wanted for the shelf unit.
I sat and thought a lot about how I was going to find a book shelf matching the dimensions... I normally create my projects from things I find in peoples trash or on craigslist. I did a little research and learned that there is a custom wood furniture/shelving place right around the corner from where I live. I talked to them and they said they could make me a shelf fitting those specs. Perfect!
I went to the paint store in hopes of them matching the paintchip I had. Unfortunately I didn't bring enough of the paint color for them to match using their fancy machine, so it was up to my eye and Peters encouragement to get the right color or at least a close match. I finally settled on what would be the yellow and hoped it would match. IT DID!
I sketched out a number of designs for it, that incorporated the wedding ring quilt idea. I settled on one design and began. I painted the whole shelf yellow. Then I made a stencil, traced it on to the side of the shelf and painted it white. THEN came the decoupaged quilting.
The pictures can tell you the rest of the story.


I cut out paper 'patches' out of decorative paper. I decoupaged them onto the shelf using Mod Podge and a polycrylic top coat.


Next time I am at Liz's cottage I will try to take a picture of the whole room. You can see the quilt in the very last photo. I had fun making this for her, and am glad that it fits in so well with the rest of the decor.
Monday, August 9, 2010
Bow Tie Ben
My big brother Ben is a bow tie wearer. I don't think he wears long ties, I think he's pretty much exclusively a bow tie man. Just like my dad wears a handle bar mustache, my brother wears a bow tie. Even for my wedding, all the guys wore matching long ties but I knew Ben needed his own matching bow tie so he'd feel like himself, so that's what he wore.
Ben was visiting and handed me a small strip of fabric and a bow tie that he likes wearing. He asked if I could make him a bow tie out of the fabric he gave me. It was kind of thick, almost a home decor weight fabric, which I wasn't sure how it would work up for such a small item, but it ended up being just fine. I guess this fabric is for a friends wedding and he wanted a bow tie to match the decor.
I traced half the bow tie that fit him onto the fabric he provided. I left enough fabric to make seams etc... I made 4 matching pieces, so that I would have front left & right, and back left & right. I added some light weight fusible interfacing (so it would hold its shape) to half of the bow tie, and sewed it together. Did a little flip inside out (with the thicker fabric was not an easy maneuver) ironed it and BOOM ready to go.
I realize I haven't been quite up with taking the photos in action lately. I will try to be more aware of this, but once I get crafting, I like the freedom of just doing it and not documenting the whole thing. . . SO here are the photos I do have.


Subscribe to:
Posts (Atom)

 Posts


