Sunday, June 20, 2010

Ode To The Mustache

HAPPY FATHER'S DAY!

Today my dad and mom came over for a bagel brunch including fresh bagels from the bakery down the road, lox, chive cream cheese, cucumber, red onion, grapefruit juice, espresso, a chocolate pastery, and almond macaroons (my dad's favorite)!

My dad is an amazing guy with an amazing mustache. It has become part of his persona over the past few years. It has had shorter days, longer days, curlier days, and down days... No matter what kind of mustache day it is, my dad is the proud wearer!


Of course this day has to include a craft project. This time it was the card that was the craft and ode to the mustache! 

I took a piece of foam core board, cut it to shape and covered the 'stache with some fun paper, wrote a message on the back, and attached it to a small gift. I am a FUN socks kind of gal and thought what better to give than something you yourself love.  I saw these and could not refuse!!! If they had come in a smaller size I would have gotten them for myself too.  Socks with MUSTACHES! 

These beauties are from Sock It To Me, I think I am in love and have found a new favorite store!

Image care of  www.sockittomesocks.com

I Love You Dad!

Friday, June 11, 2010

Ribbon Board #2

A friend of mine is expecting a little girl in September. I made this board as a card holder for her baby shower. I am not sure if this will work or not, but I figured I'd make it and we would see! Perhaps a basket is more practical?

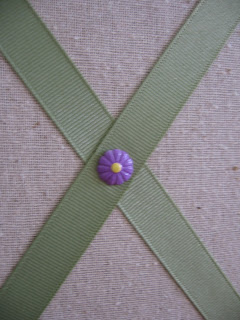
The upholstery pins are in the shape of daisies. I bought them as an antiqued brass color, which was not so appealing... so I painted them purple with yellow centers! WAY cuter.

Having this hang on the wall with cards or photos tucked in makes for a piece of nice colorful wall art. I am enjoying the one I made for myself!


Monday, June 7, 2010

Ribbon Board

Peter and I recently moved, and one of the things I had to give up was my beloved desk. It was big, heavy, awesome, and just not worth moving (it wouldn't have fit up the stairwell in our new place), did I mention it was awesome and I miss it?!

So my old desk had a hutch where I could display cards and things I thought were pretty, but the new desk, which is very sweet... is definitely a down size. I now have my mom's old secretary desk, which would fit into the petite category. It was my birthday in the end of May, and I have tons of cards floating around. I just can't bring myself to throw them out yet. . . SO I decided to delve into another project.

I made a ribbon board which is kind of like a bulletin board. I followed a Martha Stewart tutorial

First I got some Homasote board at my local Home Depot, the Homasote web page has a great list of stores where you can buy their product. Home Depot cuts this stuff, so I had them cut the LARGE sheet down into a manageable size. I think some of the pieces are still a bit big, but that's for another day.  I also got a staple gun (HOW COOL IS THAT!? I own my very own staple gun... why haven't I had one of these sooner!?)  I then went to JoAnn Fabrics and picked out some fabric with the help of Pete (decision making is not my strong suit).  We also got ribbon and upholstery tacks. . . We got home and instant crafting began.  This is what turned out.


I have a few more pieces of this Homasote board. . . so if you are in the Boston area and are interested in either the Homasote board or a finished ribbon board, let me know and we can work out a deal.

Friday, June 4, 2010

Quilted Table Runner

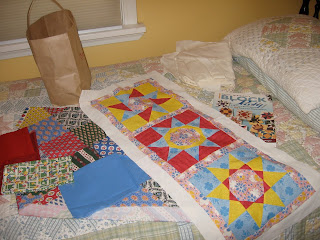
Every time Pete and I go to visit his family in Seattle I seem to come back with a new craft project! This time was no different, my mother in law, Nancy, showed me how to quilt. I have a new found appreciation for quilts and quilters, knowing the time and patience it takes to make everything line up.

Nancy first handed me a book called Block Party and gave me a few choices of what would be a good first quilting project from this book. We decided on a table runner. The cool thing about this book is that it has patterns for what seems like a gazillion different quilt squares that are all the same size so they can be put together easily.  I sat, studied the squares and came up with three that I liked and thought went well together.

Nancy then sent me into her sewing room to find fabric from her stash. I first saw this awesome orange colored one and started pulling fabric from her different boxes (organized by color) and ended up with 4 fabrics, not including that first one I liked, but something even better. The primary colors!  Once I decided on fabric, I had to choose how to organize them in the three squares to make them all unique... I wanted them all to be different but corresponding.

I cut pieces out very carefully and followed the explicit directions in the book and from Nancy (she sat with me for the first one!). Who knew there was so much pressing with the iron and lining up of seams to make these things work out, but magically it turned out!  Once I had one square done, I was on my own running out to the garden, where Nancy was working, when I had a question. I ended up with three pretty sweet quilt squares. We then decided to put on the corresponding border, a muslin outline, and then came the batting, backing and the trim. I even learned how to make mitered corners on the trim!

This is what turned out:

Deciding on backing & trim fabrics.

Completed front.

The back. This fabric has the look of being a quilt, but it's really one piece.

I hand quilted a few ties on it, to hold the layers together.

Mitered corners! I hand sewed the trim on the back side while on the plane.


Not bad for a first quilting project if I do say so myself!

Friday, May 21, 2010

Pillow Rescue

My mom and dad have this pillow that's been around for many many years. It finally bit the dust, and my mom asked me to rescue the beautiful tapestry on the front... so I did!


I carefully removed the front panel which was in fine condition (other than being dirty from couch use for probably 15 years). I used my seam ripper to remove the front.  I tossed the back fabric and the stuffing which I am sure had dust mites out the wazoo.  I then washed the tapestry part with some woolite, and BOY did it need washing!  I hung it up to dry and went to the fabric store.  I got some dec weight black fabric and some cool cord for the trim.


I never have sewn using a trim before so I looked at some projects on some of my favorite DIY blogs, and figured it couldn't be that hard! I then used the old noggin and figured why not use the zipper foot. I recently have been convinced that sewing can't be that hard, so why not give things a try that I've never done before!  The zipper foot for my sewing machine in theory is used for zippers, but is also perfect for getting right up against the edge of something. (Not sure if this is a conventional way to do trim, but it made sense in my head!)

I first basted the trim to the front, so it would be easier in the long run, I did this on my machine using the longest stitch length. Then I pinned all around right sides together, and sewed right up against the trim which was sandwiched between the front and back. I flipped it inside out and POOF it worked!


I then got Pete to help me stuff the new pillow form into the cover. Then I sewed up the hole and it looks great (if I do say so myself). Then I took pictures and realized that the colors in the tapestry magically match MY couch just perfectly... BUT  ho hum, I did re-do the pillow for my parents so I will give it back to them.

Sunday, May 9, 2010

Coasters

I made my mom and my mother-in-law coasters for mother's day!  They turned out pretty well if I do say so myself. A couple of tiles, a few images, a little mod podge, some polyurethane, cork contact paper, and some satin ribbon, along with a paintbrush, a glue gun and some free time, got these puppies done.  I was inspired by a tutorial I saw on Prudent Baby.


The set for my mom has wrens on them, she has some nesting in her yard.


The set for my mother-in-law has different animals on them. A kangaroo rat, a bee, a chicken, and a seahorse.

Saturday, May 8, 2010

Throw Pillow Covers

I have had the same futon and throw pillows since college.  I used to use a nice tablecloth/flat sheet to cover the futon. No matter how well I tucked it, it would fall off, or get into a bunch. The two mismatched throw pillows have been around just as long as the sheet cover.  One is bright blue fleece, and the other a blue/green/purple plaid chenille.

Pete and I just moved and decided that it was time to buy a proper futon cover that zipped around. We bought a nice solid lavender colored cover. I then decided that I would make matching covers for the pillows, so that we would have pillows that matched the futon.

I made them out of three pieces of fabric, front, and two back pieces so I could slide the pillow in, yet have the back look finished. 

This is what turned out: